Dr. Levin’s Phi Dental Grid, developed by PhiMatrix, is an authorized software implementation of Dr. Eddy Levin’s copyrighted dental grids, which apply the principles of the golden proportion to dental aesthetics. Instructions are below.
Launch the software
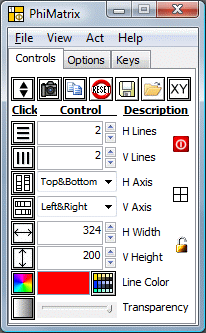
When you first launch the PhiMatrix software, you will see the Control Grid as shown below:
The PhiMatrix grid overlays images displayed in any other program on your PC, allowing you to use any dental image software or your favorite photo viewer or editor to display your photos.
Select the Levin Dental Grid
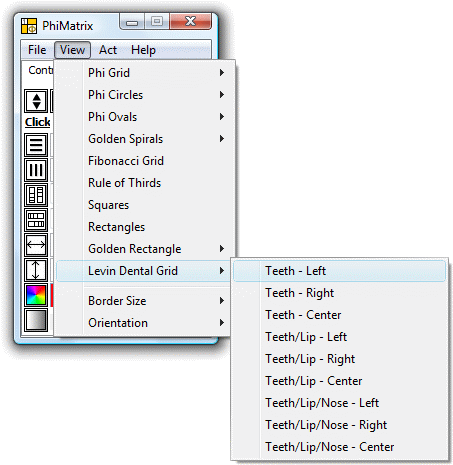
To access Dr. Levin’s dental grids, go to the View menu, select Levin Dental Grids and then the desired grid for your analysis.
This will show the basic dental grid below:
Save the Dental Grid as the default grid
The first time you use PhiMatrix it is recommended that you select the view you want as your default view, such as Teeth-Left, and then use the “File – Save Settings as Default” menu option to set that grid as the default grid that will appear whenever you launch PhiMatrix for subsequent uses.
Use the Option tab of PhiMatrix to add a title or footer to the grid image
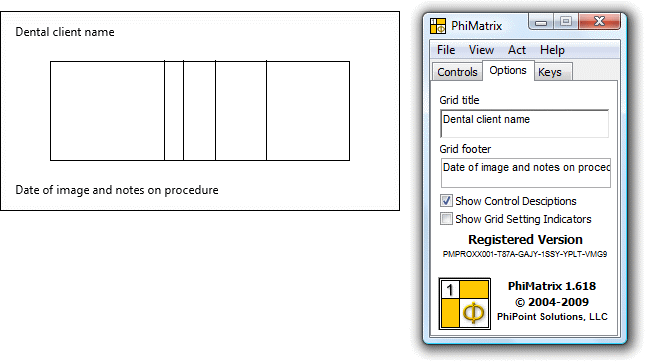
Note that you can place a header and footer on each grid image that could be used for a client name and other identifying information. To enter a header and/or footer, click on the Options tab of the Control Window and enter the information in the Grid Title and Grid Footer boxes.
Select the View – Border Size menu option to adjust the position of the Title and Footer to either inside or outside the area of the dental grid itself.
Using the program
This example assumes you are analyzing the right side of the mouth, or in other words, working on the left side of the photographic image.
Click and drag the program application at the title bar to align the bottom right corner of the grid with the bottom inside corner of the central tooth.
If desired, enable the top and bottom horizontal grid lines to identify the placement of the upper lip and nose.
Click and drag the top border of the application window so that the grid aligns with the upper line of the central tooth and, if applicable in your photo, the upper lip line and bottom of the tip of the nose.
Click and drag the left border of the application window so that the grid aligns with outside of the smile.
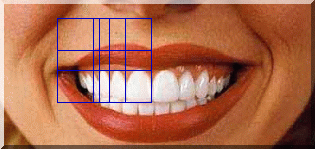
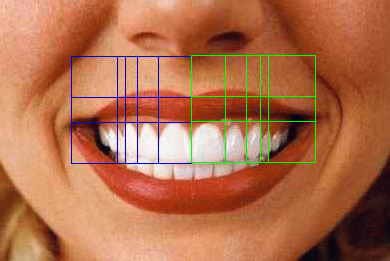
The program will show the most aesthetically pleasing dimensions of the central, lateral, canine and pre-molar teeth, as illustrated in the photo below.
Once the analysis of the image is complete, click on the Screen Shot button to save the image and grid overlay to file in either BMP, JPG, GIF or PICT format.
Most mouths are not symmetrical. To analyze both sides of the mouth, use the Screen Shot button to save an analyzed image of one side of the mouth. Next display that analyzed image, and set the Toolbox option to “Flip Verticals” to analyze the opposite side of the mouth, as shown in the photo below. Adjust the border size or change the grid color to get the desired effect. You can also launch two instances of PhiMatrix at once to do your analysis with two independent grids.
For additional information on program features and functions click HERE.
Credits
Dr. Levin’s Phi Dental Grids are copyright 1978 by Dr. Eddy Levin.
The PhiMatrix software application of the Dental Grids is copyright 2004-2013, Gary B. Meisner.
Software development is by Gary B. Meisner.

Hi, working with golden proportion everytime I do classes. On the grids you have one number, for example 30.75. I understand that it is the buccal corridors, but the numbers?
Lars
That number represents the half width of the smile in millimeters. See more at http://www.goldenmeangauge.co.uk/dental1.htm