PhiMatrix is a universal overlay, not a plugin. This allows it to be used with any image on your screen, and with any other software.
While that can be an advantage, because it is not a plugin it isn’t as tightly integrated with other software as a plugin would be.
Here are some tips on how to best use PhiMatrix with other software.
Using Multiple PhiMatrix Grids/Templates at the same time
It’s easy to use multiple grids or templates at the same time.
On Windows, just launch PhiMatrix multiple times from the Start menu or by clicking on its desktop icon.
On Mac, you’ll need to copy and paste the PhiMatrix app to create multiple versions that you can name PhiMatrix, PhiMatrix1, PhiMatrix2, PhiMatrix3, etc. Then from the Apps folder or desktop icons you can launch each of these versions of PhiMatrix separately.
Each time you launch a new instance of PhiMatrix, each will have its own grid/template and Control window. These will launch in the same place on the desktop, so you’ll need to move the grids and Control windows of each to where you want to use them.
Lock the PhiMatrix Grid in place
You can lock and deactivate the PhiMatrix grid. This allows you to use your underlying software with no conflict of your mouse actions on the PhiMatrix grid.
Do this by clicking on the Lock icon (or selecting the File-Lock and Deactivate Grid menu option). Reactivate the grid by clicking on the Lock icon (or selecting File-Unlock and Activate Grid menu option).
All PhiMatrix control window and grid functions are still active in this mode, except mouse movements and clicks.
Adobe Crop centering
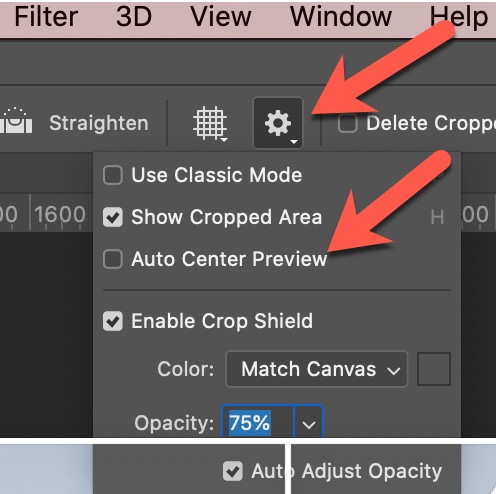
Certain Adobe products dynamically center an image as you select an area of it for cropping. If you have PhiMatrix overlaying this image to help in your cropping decisions, this can be very frustrating and Adobe continually moves the image around the screen as you change the crop area.
The solution to this is to disable change Adobe’s “Auto Center Preview” control. Other software may have similar options:

Zoom the Grid to match the underlying software
If you Zoom in on an image in your underlying software, you can often match the grid you’re using in PhiMatrix by using the Zoom feature.
Highlight the PhiMatrix control menu or grid and then press Control-z (or the View – Zoom menu option) to increase the grid by any percentage size to match image size changes you make while editing in your underlying application.
This feature is available in PhiMatrix 1.618 Pro, but not in PhiMatrix Golden Ratio Design at this time.
Creating your own grids
Some use PhiMatrix to create grids that can be used as layers or guides in their favorite digital editing program. The methods vary by program, but try creating a PhiMatrix grid against a solid background, save it with that background as transparent and then bring it into your favorite software as a transparent layer.
Enhanced screen shots and captures for clipboard, image file or print
PhiMatrix has the ability to take a screen shot of the screen area with the grid’s border, and save it to the clipboard, various image file formats or to print.
If you want a more flexibility than that, I heartily recommend Lightshot, a free app that is dedicated to screen shots. It can be activated by simply touching your keyboard’s PrintScreen button and has many great features including keyboard controls for moving and resizing the screen shot area, extensive annotation tools, saving to a free cloud location, searching for similar image on Google, saving in a variety of images formats, and copy to clipboard or print.
Download it for Windows or Mac here:
