PhiMatrix can be used to crop a photo to highlight key elements with golden ratio proportions to give a better sense of balance and composition. This is illustrated in the two tutorials below.
Cropping using the Phi grid
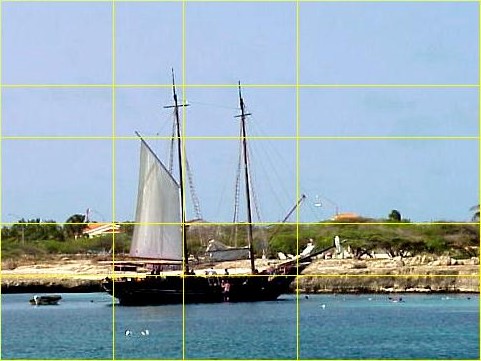
Start with the original photo sailboat.jpg below:

If the Border Size is greater than zero, reduce it to zero so that your final photo will be the same size as the grid.
Adjust the grid to the size you want by clicking and dragging. It’s easier to get exact sizes if you drag the horizontal and vertical sides separately. In this case, set the H Width to 480 and V Height to 360.
Click on the horizontal and vertical line counters to add lines to highlight key elements of the photo. In this case, four horizontal lines were selected by setting H Lines to 3 and H Axis to Both to mirror the top and bottom. Three vertical lines were used by setting V Lines to 3 and V Axis to Left.
Move the grid up and down to align the grid lines with the key elements of the photo. In this case, the horizontal phi lines were aligned with the horizon of the sky, the deck of the ship and the tops of the small sail and forward mast. The vertical phi lines were aligned with the main mast of the sail and the front and back of the boat.

Eliminate the grid lines from your photo by setting the Transparency to zero.
Click on the Snapshot icon (Camera) to save your cropped photo in an image format of your choice, either gif, jpg, pict, png or bmp.

Note how the cropped photo looks in comparison to the original photo above and how it gives a much better sense of balance and composition:
 |
 |
| Before – Original | After – Balanced & Cropped |
To use PhiMatrix to crop an image to a standard photo size, do the following.
- Set Aspect – Set the Aspect to the desired photo size, e.g., Photo 5×7, for instance.
- Set Orientation – Set the Orientation to Landscape or Portrait.
- Set Grid Lines – Set the H Lines and V Lines to the number of lines needed to position key elements of the photo according to phi or golden section proportions.
- Position the Grid to Compose the Scene – Click and drag the upper border to position the grid to desired upper left position on the image. Click and drag on the lower right hand corner of the grid to adjust to the desired grid size. Position the grid over the photo so that the key elements of the photo fall on the grid lines.
- Clear the Grid Lines – Clear Set the Transparency control to zero to eliminate the grid lines from the photo.
- Save Your Cropped Image – Click on the snapshot icon (Camera) to save your cropped photo in an image format of your choice.
Cropping using the Golden Spiral Grid
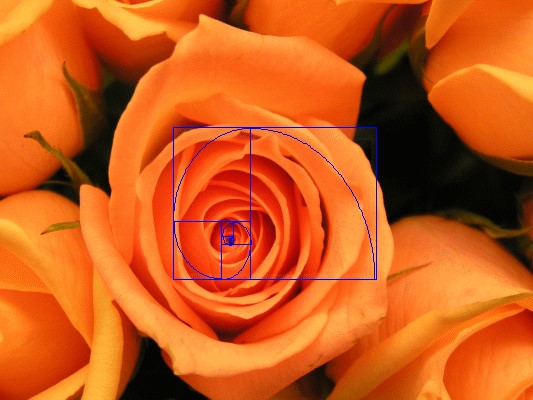
Here’s another example of photo cropping using the Golden Spiral Option. This is the original photo, shown below at a reduced size of the original high resolution photo.

Use the “View – Golden Spiral – Landscape – Lower Left” template option to identify a focus point of the image based on the focal point of the Golden Spiral as below. Note that in this case the Aspect Ratio of the grid was set to 4:3 rather than Phi. Size the grid to capture the most interesting part of the image.

To eliminate the spiral grid from the image, set the Transparency to zero. (As an option, if you want to keep a border around the image, set the Grid Color to black and set the H Axis to “None” to leave the border without any interior grid lines of the spiral.)
Then crop the photo by using the “File – Copy Image” or “File – Save Image” function in PhiMatrix to get just that part of the image.
Adding a Golden Matte to frame a photo
For a finishing touch, open the image in your digital photo editing program of choice, your system’s image viewer or a browser so that it is displayed against a solid background color. Position the PhiMatrix grid over the image again and then use the “View – Border Size – Golden Matte Out From Grid” to get put a matte area around the image. This PhiMatrix Golden Matte function creates a border whose area is in the Golden Ratio of, or 1.618 times, the area of the image itself, an optimal size for overall aesthetics and balance.
Matte the photo by using the “File – Save Image” function again in PhiMatrix to save the matted image with the new border.

So there is the finished cropped and matted image, no longer just a stock photo but now a work of art ready for framing, all done with Golden Ratios.
See other examples of photo cropping and composition in the User Gallery.
I am going to test this application on my images within Photoshop and Lightroom. From what I have read so far I am impressed with it. I have downloaded the demo, but I am leaning towards purchasing the personal addition.