Easy and intuitive, yet vastly customizable to create you own unique design applications
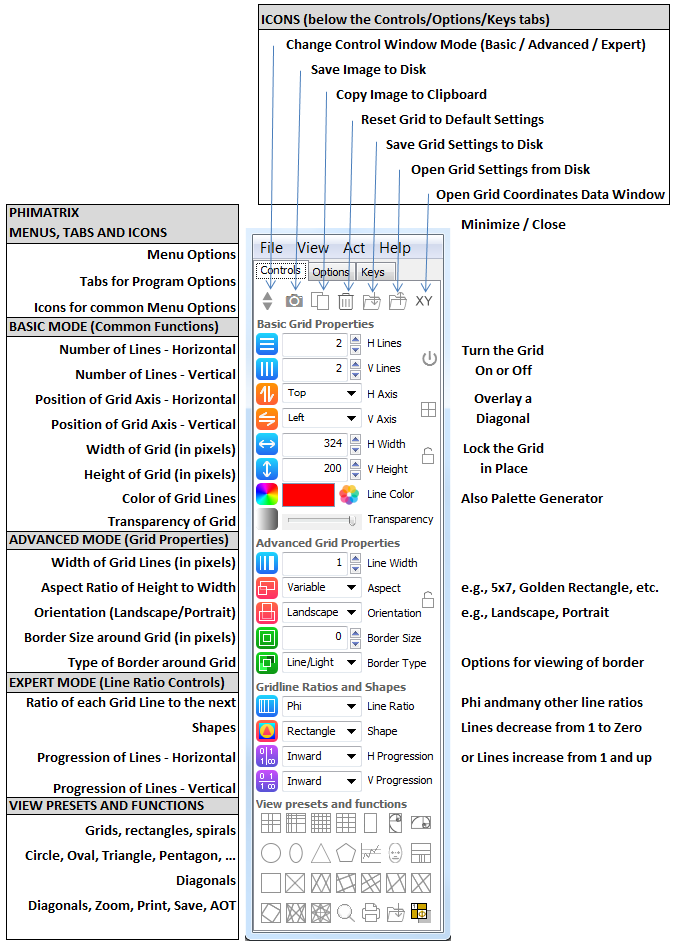
The PhiMatrix transparent grid overlays any other program, allowing you to unveil and apply phi, 1.618, the golden ratio in any type of design or analysis work. In addition to phi proportions, the program allows you create grids using just about any geometric or arithmetic proportion between grid lines, with a variety of options in the grid itself and the grid lines. The function and options of each of the controls is displayed below.

Tips and Tricks
-
Keep it Simple – PhiMatrix offers lots of options but to keep it simple just leave it in Basic mode with the Line Ratio (in Expert Mode) set to Phi and the Aspect (in Advanced Mode) set to Variable. Set the grid for 2 or 3 Horizontal and Vertical Grid lines and you’ll find all kinds of ways that you can unveil or apply the Golden Ratio.
-
Learn by Trial and Error – PhiMatrix offers many controls, but most are simple and quite intuitive. Just click on them to see what they do.
-
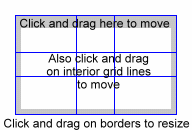
Positioning the Grid – Position the grid to the top left position by clicking and dragging the watermark area just below the top border or an interior grid line. (See image at right.)
-
Border Options – You can eliminate the watermark area of the borders by setting the Border Type to Line Only or No Border.
-
Adjust the Grid Size – Adjust the grid size by clicking and dragging on the watermark area of the bottom or right borders. Hold the Control key while resizing to lock the grid center in place. Select the View – Zoom option to increase the grid by any percentage size to match image size changes you make while editing in your underlying application.
-
Lock the Grid – Lock and deactivate the grid so that you can use your underlying software with no impact of your mouse on the grid by selecting the File-Lock and Deactivate Grid option. Reactivate the grid by selecting File-Unlock and Activate Grid. All grid functions except mouse controls are still active in this mode.
-
Click and Drag on the Grid Itself – You can still drag and resize the grid by clicking on the grid itself but you may want to make the Grid Line Width greater than one so that you don’t have to be quite so precise with the mouse in grabbing the outside border to resize or the inside lines to reposition the grid.
-
Use the Cursor Arrow Keys – Click on the Keys tab of the Control Window and then use keyboard cursor arrow keys to position the grid (shift-arrow), make the grid larger (Ctrl-arrow) or make the grid smaller (Alt-arrow). The four cursor arrows correspond to the top, bottom, left and right borders of the grid.
-
Minimize / Maximize the Grid – Open or maximize another program to hide the Control Window behind it while leaving the grid on top. Minimize the Control Window to minimize both the Control Window and the grid.
-
Save Your Favorite Settings – Select File – Save settings as default to save the current grid settings as your default settings for PhiMatrix when you launch it or click the reset button.
-
Eliminate the Border – Set the Border Size to zero if you do not need to save, copy or print an section of the screen that surrounds the grid itself.
-
Custom Ratios – Type your own numbers into the Aspect or Line Ratio boxes to customize those settings to your own unique ratios.

Using the Data Window
The Data Window provides an additional tool for determining grid dimensions and applying these dimensions to other projects, and is particularly useful in working with non-digital projects.
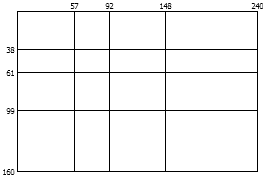
Suppose that you’re working with something that is 16 x 24 in dimensions, be it a 16″ x 24″ canvas or a 16 x 24 foot room. You want to know where the phi lines fall in order to position key design elements in a way that gives beauty and balance.
Click on the XY icon on the Control Window to open up the Data Window. Set the number of grid lines (H Lines and V Lines controls) to the desired number. Click and drag the PhiMatrix application to resize it and watch the numbers in the Data Window as you go. Get to numbers that represent the size of your design project, and in this case you would use 240 by 160. The dimensions for all the key points of your design are displayed in the status window. So on a 24″ canvas, you would want to place key design elements at 5.7″, 9.2″ and 14.8″ horizontally (corresponding to the X coordinates) and at 3.8″, 6.1″ and 9.9″ vertically (corresponding to the Y coordinates).

|
PhiMatrix Professional 1.618 Feature List
Basic Mode Grid Controls (All you’ll need for projects using a Phi-based “golden ratio” grid)
- The Transparent Borderless “Golden Ratio ” Grid Overlay – Drag and resize the Phi-based “Golden Ratio” grid as a transparent overlay to any image or application on your computer screen. PhiMatrix provides a free-floating grid with no application window frame or border to obstruct your images or other applications.
- Windows and Mac – Developed in cross-platform environment to run on Windows 2000, XP, Vista, 7, 8 and Mac OS X.
- Easy, Intuitive, Helpful User Interface – Descriptions and intuitive icons on the Control Window to describe each control. Help bubbles appear over every icon or control to describe its function.
- One Click Controls – The “Quick Click” icons on top and left sides of the Control Window cycle through most common options with the click of the mouse or roll of the mouse wheel.
- Select the Number of Grid Lines – Vary the number of horizontal and vertical grid lines from 0 to 100.
- Select the Grid Orientation – Flip the orientation of the grid to any of the four corners (top, bottom, left, right) or just display it in mirrored mode (top & bottom, left & right, center) or with either the horizontal or vertical grid lines eliminated.
- Easy Grid Resizing – Resize with the mouse by clicking and dragging on the grid or change the size of the grid by using the controls and mouse wheel on the Control Window.
- Easy Grid Positioning – Move the grid on the screen by clicking and dragging on the grid with the mouse, by using cursor controls on the keyboard or by the control panel with the mouse wheel.
- Custom Grid Colors – Click through standard colors selections for easier viewing against different images or use the color palette for user customizable colors.
- Select the Transparency – Adjust the grid transparency from 0 to 100 percent transparency to make it easier to see your original image.
Basic Program Menu Functions and Controls (Icons on the top row and in menu functions)
- Resizable Control Window – Variable Control Window sizes to minimize its footprint on the desktop screen when descriptions are not needed.
- Copy/Save/Print – Finished images can be copied to clipboard, saved to image files (gif, jpg, bmp, png, pict) or sent to the printer.
- Reset – Reset button to return the grid to its original settings or saved personal default settings with a mouse click.
- Save/Load Settings – Save as many favorite grid settings to disk as you want or load a variety of sample grids available for free on the User Guide page.
- Save Settings as Default – Save the current grid settings as a default to be loaded automatically when the program is next launched or when the Reset button is selected. (Available from File menu.)
- XY Grid Data – Data window to show gridline positions in pixels, percents or measures based on user project dimensions, which can be copied to clipboard.
- Color Palette Window – A color palette generator used to generate rich, appealing color schemes. The entire PhiMatrix color palette is based on golden ratio (Phi) relationships of the hues of two colors.
- Add Notes – Add your own title and footer text to the grid to annotate images (Options tab).
- Lock and Deactivate Grid – Deactivate and lock the grid in position to prevent the mouse controls of the grid from interfering with the functions of the underlying program (e.g., use paint tools in Photoshop without any interference of the mouse in PhiMatrix.)
- View – Automatically sets the Control Window settings to provide instant access to a variety of gird patterns including phi grid, phi circles, phi ovals, golden rectangles, golden spirals, Fibonacci grids, Rule of Thirds grid, square grids, rectangle grids and dental grids. Also select advanced program options for aspect, orientation and border width.
- Act(ivation) – Select free trial, purchase or update, perform offline registration and select language option.
Advanced Mode Grid Controls (To add or change a border around the grid or set fixed aspect ratios and orientations for photo editing, layout, etc.)
- Select Line Width – Grid line width option from 1 pixel to 30 pixels.
- Select / Define Aspect Ratios – Lock grid to common aspect ratios used in photos, digital media and print (e.g., Golden Rectangle, 5×7, 16×9, 8.5×11, user-defined).
- Select Landscape / Portrait – Select grid aspect ratios to landscape or portrait orientation.
- Variable Border Size – Adjustable border size to frame surrounding image outside of the PhiMatrix grid itself for saving, copying or printing the entire image area.
- Optional Variable Image Border Styles – Choice of optional borders to show the screen area surrounding the grid selected for copy/save/print.
Expert Mode Grid Controls (To use grid line ratios other than Phi for added versatility and more demanding applications)
- Grid Ratio Options – Additional grid line ratios beyond Phi, including Square Root Phi, Marquardt Ratio (Cube Root Phi), Phi Squared, Fibonacci Series, Levin Dental Grid, 1, 2, 3, Root 2, Root 3, Root 5, Ovals/Circles and user defined ratios.
- Grid Progressions – Gridline progression option that divides the entire grid inward or expands the smallest grid segment outward, by phi and other ratios.
Menu Options
- File menu includes options to:
- Save, copy or print images
- Save or reset program options
- Open the Data Window or Color Palette Window
- View menu includes options to:
- Access numerous preset grid options, including Phi, Fibonacci, Golden Rectangle, Golden Spiral, Circles, Ovals, Rule of Thirds, Squares, Rectangles, Face, Dental Grid
- Change Aspect, Orientation, Border Size
- Hide, lock and zoom the grid
- Act menu includes options to:
- Try or Purchase the Program
- Perform offline activation functions
- Set the language to English, German, French, Italian, Spanish, Portuguese or Humgarian. Other languages available upon request.
- Help menu includes options to:
- Access information about the program
- Access online Help guides
